Biology · Early secondary · 50 min
Two groups look at the same leaf and write different answers. One notes, “There is a thick line that branches out”; the other, “This leaf is old.” The first sentence describes something visible. The second suggests an explanation that the image alone may not support. That difference can be the starting point for a good science lesson.
The Tree Leaves remote laboratory, from RELLE (UFSC), lets students select six samples and view images from real experiments recorded with a microscope. The proposal for this class is simple: compare two samples, create a record that someone else can understand, and decide which conclusions need more information. It is designed for early secondary school and a lesson of about 50 minutes, which you can adapt to your class.
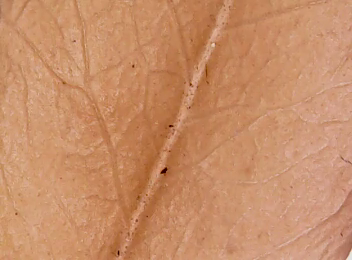
Sample 6
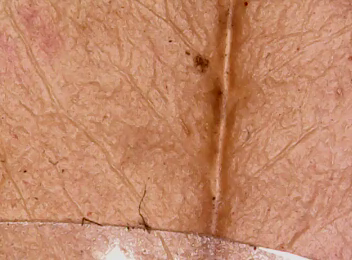
Sample 5
A question that observation can answer
Write on the board: “What similarities and differences can we document between these two samples?” This is more manageable than “Why do leaves age?”: it defines what students will do and avoids asking for a cause before they have evidence.
Before opening the laboratory, show one image and ask each student to write two sentences: an observation and a possible explanation. You do not need to correct all of them straight away. Keep two or three to revisit at the end. They will help you check whether students have learned to distinguish between describing an image and interpreting what it means.
Prepare a meaningful comparison
Check on the devices your class will use that you can open the laboratory and select the chosen samples. Organise pairs with one student navigating and the other recording; ask them to swap roles for the second sample. If you have only one computer, project the laboratory and collect individual records on paper.
Choose two samples for the whole class, such as 6 and 5, shown above. Ask students to identify the area they are observing and compare equivalent details. If they enlarge the image on screen, they should record that: an area may look bigger because of how it is displayed, rather than because of a difference in its actual size.
Allow a few minutes to practise selecting samples and finding details in the images. Then set a focused task: three observations per sample, a drawing with two labelled details, and a comparison. Rushing through all six samples usually leaves less time to look closely.
A 50-minute lesson
- 0–7 minutes: observe and predict. Collect the initial sentences and agree on what counts as a description. “It has spots” needs more detail: where are they, what shape are they, and what are they being compared with?
- 7–12 minutes: get to know the laboratory. Show how to select the two samples. Check that each pair records the correct identifier and can find the area it describes again.
- 12–27 minutes: record two samples. Pairs observe, draw and make notes. Ask them to point to a specific area to justify each statement. Remind them that “It is not clear enough to tell” is a valid observation.
- 27–40 minutes: compare records. Two pairs swap worksheets. Each pair should find the details described by the other in the image and identify one claim that still needs evidence.
- 40–50 minutes: revisit and conclude. Return to the initial sentences. Each student rewrites an explanation that was too confident and proposes what information would help test it.
These timings are a suggested structure. If your class needs more help getting access, reduce the number of observations while keeping the exchange between pairs and the final review.
What to ask students to record
The observation and comparison worksheet has space to identify the two samples, draw details, and separate observations from hypotheses. The aim is not a beautiful drawing, but one that helps another person recognise and review what was observed.
| Record | Example of a useful response |
|---|---|
| Located observation | “Next to the central line, finer lines branch out towards the sides.” |
| Comparison | “In this view, I can make out the network of lines more clearly in sample 6 than in sample 5.” |
| Hypothesis | “The difference might depend on sample preparation or lighting.” |
| Missing information | “I would need to know how the samples were prepared and look at equivalent areas.” |
Questions that move the discussion forward
While pairs work, “Where do you see it?” is often more useful than “What is it?” If a student identifies a vein, ask which features led them to that conclusion. If someone says they can see cells, ask whether they can trace their outlines or are looking at a pattern they do not yet know how to interpret.
Colour is a good opportunity to discuss limits. Leaves may contain different pigments, but a photograph alone does not identify a substance. Nor does a reddish area establish the age of a leaf. Species, preparation, lighting and the condition of the tissue can affect its appearance. The US Forest Service summary of why leaves change colour can help you prepare that explanation. Introduce names for structures or pigments when they help explain an observation, and distinguish that information from what the class has checked directly.
Avoid arranging the six samples from “youngest” to “oldest” without information that supports that sequence. The laboratory allows students to compare samples; investigating change over time would require observations of the same process over time under known conditions.
A short conclusion that shows what students have learned
Ask for three sentences: “I observed…”, “One possible explanation is…” and “To test it, I would need…”. For example, a student might describe a network of lines, tentatively relate it to leaf veins, and ask for a reference image to check that identification. What matters is that the three sentences connect, rather than how much terminology they contain.
If an explanation changes after the exchange between pairs, keep both versions. Showing how a claim has become more precise is a valuable part of scientific work.
Resources for preparing the class
Start with the Tree Leaves laboratory page. For this lesson, download the observation and comparison worksheet. For other guided biology activities, browse the LabsLand Teach catalogue and check which laboratory each activity uses.